So cute !
Five delicious holiday desserts your kids will fall in love with
We are all a little crazy about winter holidays; we love the unique atmosphere and joy they bring. We believe in miracles, and we try to make tiny little magical things happen to our kids. If you already missed the spirit of this special season, try out these five cute desserts. Your kids will love them!
1. ’’Rudolph the Red-Nosed Reindeer’’ cookie balls

Ingredients:
- 30 Oreo cookies
- 8 oz (250 g) cream cheese
- 8 oz (250 g) confectionery coating
- mini pretzel twists for Rudolph’s antlers
- red M&M’s candies for Rudolph’s nose
- white candies for Rudolph’s eyes
- edible markers for Rudolph’s pupils
Instructions:
1. Place the cookies in a food processor and pulse until they form crumbs. Add in the cream cheese and mix it. It should have a dough-like consistency.
2. Using a tablespoon, portion the cookie dough and roll it into small balls. Place on a baking sheet covered with parchment paper.
3. Take the pretzels and break them to form antlers. Press the antlers into the cookie balls. Freeze over night.
4. Melt the confectionery coating as directed on the back of the package. Carefully dip the cookie balls into the melted confectionery coating. Place them back on baking sheet.
5. By the time you’re done with the dipping process, the first cookie ball will be hardened enough for decoration. Using the remaining confectionery coating, place Rudolf’s eyes and nose. Let them harden. Serve and enjoy!
Source: thissillygirlslife
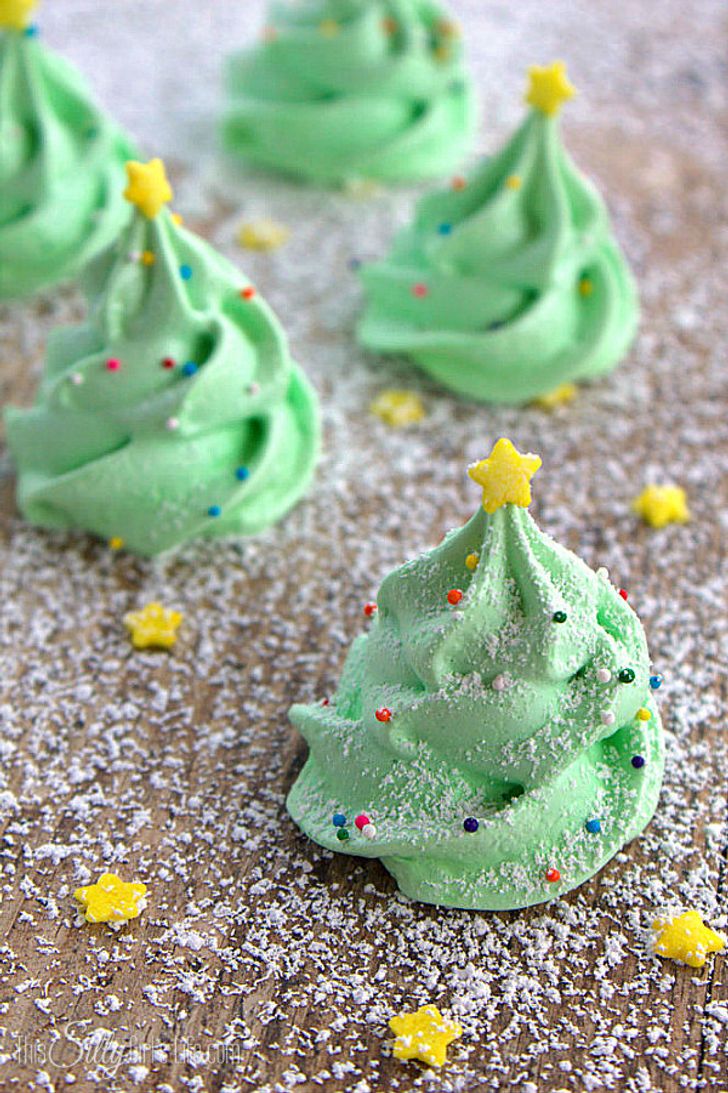
2. ’’Christmas tree’’ meringue cookies
Ingredients:
- 4 egg whites at room temperature
- 1 cup white sugar
- pinch of cream of tartar
- 1/8 tsp almond extract
- green food coloring
- multi-color sugar sprinkles
- star sprinkles
- frosting of your choice
Instructions:
1. Heat the oven to 390°F (200°C). Place egg whites, sugar and cream of tartar in a bowl. Place the bowl over boiling water on the stove and whip the mixture until the sugar dissolves completely. Remove from heat and add in almond extract.
2. Using the blender on medium speed, whip egg whites until they become bright white but still runny. Add in food coloring and keep on whipping until this mixture can form stiff peaks.
3. Place the mixture into piping bag with a large star-shaped tip. Pipe your meringues onto baking sheet covered with parchment paper or a silicone mat. Make your meringues about 1 inch (2.5 cm) in width, 2 inches (5 cm) high and place them 1 inch (2.5 cm) apart from each other on a baking sheet. Sprinkle multi-color sugar sprinkles on them.
4. Bake for 2 hours. Open the oven and let your meringue cookies stay in there for an additional 2 hours.
5. Using some of the remaining frosting, place the star on the top of the “tree”. Serve and enjoy!
Source: thissillygirlslife
3. ’’Santa’’ sugar cookies

Ingredients:
- 12 sugar cookies, round in shape
- 15 oz (450 g) vanilla frosting
- 24 white candy eyes
- 12 red candy noses
- red sugar sprinkles
- 1.8 oz (50 g) sweetened shredded coconut
- 12 mini marshmallows
- edible marker
Instructions:
1. Using a small knife or a toothpick dipped in frosting, place 2 candy eyes and 1 candy nose onto the cookie. Using an edible marker, draw pupils.
2. Spread the frosting on 1/3 of the cookie top.
3. Carefully sprinkle the red sugar sprinkles on top of the frosting, leaving a thin line of white frosting.
4. Spread the frosting on 1/3 of the cookie bottom.
5. Spread sweetened shredded coconut onto the frosting.
6. Place mini marshmallows on the top of the cookie.
7. Using edible marker, make your Santa smile.
Source: tablespoon
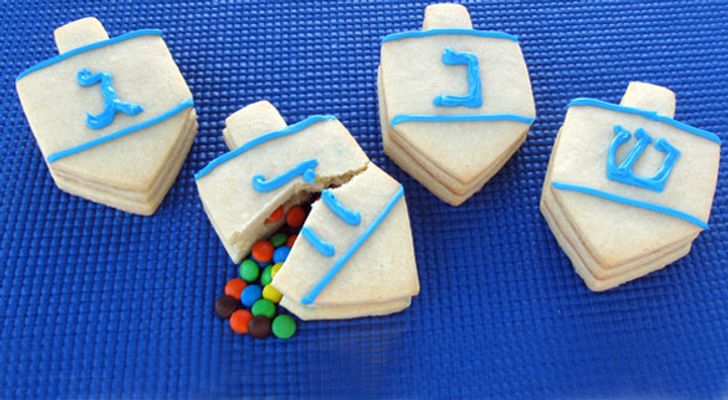
4. Surprise cookies
Ingredients:
Instructions:
1. Mix flour, salt, and baking powder together in a bowl. Set aside.
2. Whip butter and sugar until the mixture forms light and fluffy cream. Add eggs, vanilla and almond extract. Mix together.
3. Add dry ingredients and stir them together.
4. Roll out the dough and using a special cookie cutter, cut out your cookies in the form of little houses. Using a small square cookie cutter or a knife, cut the centers out of 1/3 of your cookies. These are going to be the windows of our ’’houses’’.
5. Refrigerate cookies for 30 minutes.
6. Preheat oven to 430°F (220°C)
7. Bake your cookies on a baking sheet for 12-16 minutes until the edges begin to go brown.
8. Let the cookies cool down completely.
9. Add food coloring to vanilla frosting. Fill the piping bag with frosting.
10. Decorate the cookies without “windows” with frosting. Pipe two lines and add one of the the four Hebrew letters in between. Allow frosting to dry for about 15 minutes.
11. Place the cookies without “windows” on your baking sheet. On a cookie with the “window,” pipe a thin line of frosting. Press two cookies together, with and without “windows,” and they will stick together just where the line of frosting was.
12. Fill the "window’ with small candies, raisins, or nuts. Pipe a thin line of frosting around the window. Place the decorated part of the cookie without the “window” on the top.
13. Let your cookies stay at room temperature for about 30 minutes before serving, so that the frosting hardens and the cookie layers stick together. You can store the cookies in an airtight container for up to five days.
Source: tablespoon
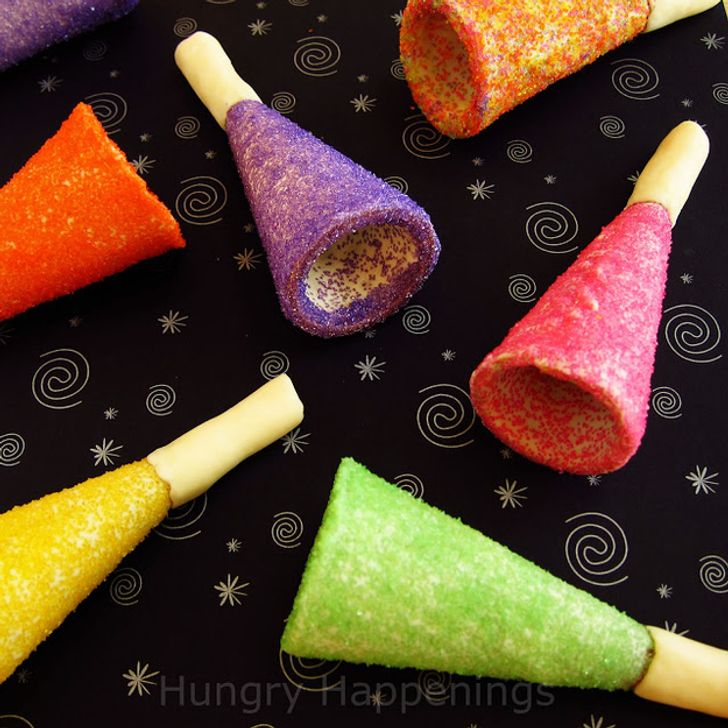
5. Sugar party horns
Ingredients:
- 12 sugar cones (ice cream cones)
- 22 oz (600 g) melted white chocolate (with cocoa butter) or confectionery coating
- multi-color sugar
- white modeling chocolate (here you can also use around 5 oz white taffy)
Special equipment:
- tall glass (a little wider than your sugar cones)
- skewer for chocolate modeling
Instructions:
- Pour melted white chocolate or confectionery coating into a tall glass.
- Hold onto the tip of a sugar cone and dip it into the glass. Except for its tip, the whole sugar cone should be covered with chocolate.
- Remove the cone from the glass and make sure the excess chocolate drips off. Use a tiny spoon to get the chocolate up to the tip of the cone.
- While the chocolate is still wet, sprinkle the cone with color sugar. You can sprinkle from the inside too, if you’d like.
- Place the cones in the refrigerator for about 10 minutes until the white chocolate hardens. If you used white taffy, place your cones in the freezer.
And last but not least, the chocolate blower.
- Make 12 small pieces out of the white modeling chocolate. Roll them into 1/2-1 inch (2-3 cm) long logs.
- Insert a skewer into the log, creating a hole. Move the skewer around until the hole fits the cone tip.
- Remove the skewer and place this chocolate blower to the cone tip. Reshape it slightly, if needed.
You can keep your sugar party horns in an airtight container for up to one month. They will definitely rock your party!
Comments
Related Reads
My MIL Had Too Many Opinions About My Stepson—So I Asked Her to Leave

I Refused to Let a Family Tragedy Ruin My Christmas

8 People Who Experienced Eerie Things That Are Too Hard to Grasp

I Ran Away From Our Family Vacation After My Son Gave Me an Insulting Ultimatum

14 People Reveal the Biggest Lies They’ve Caught Someone In

My Wife Was Sneaking Out of Bed at Night, and When I Chased Her, My Life Made a 180° Turn

12 Stories of Strangers Whose Actions Left a Lasting Mark

9 Moms Who’d Rather Forget Their Bank PIN Than Meet Their Daughter-in-Law

10 Nannies Whose Disturbing Stories Could Become a Film

Neighbors Were Stealing From My Mother’s Garden So I Taught Them a Lesson
My Husband Let His Female Best Friend Spoil the Special Dish I Made, I Ended Up in Therapy

10+ True Stories About the Most Disgusting Things People Witnessed
